

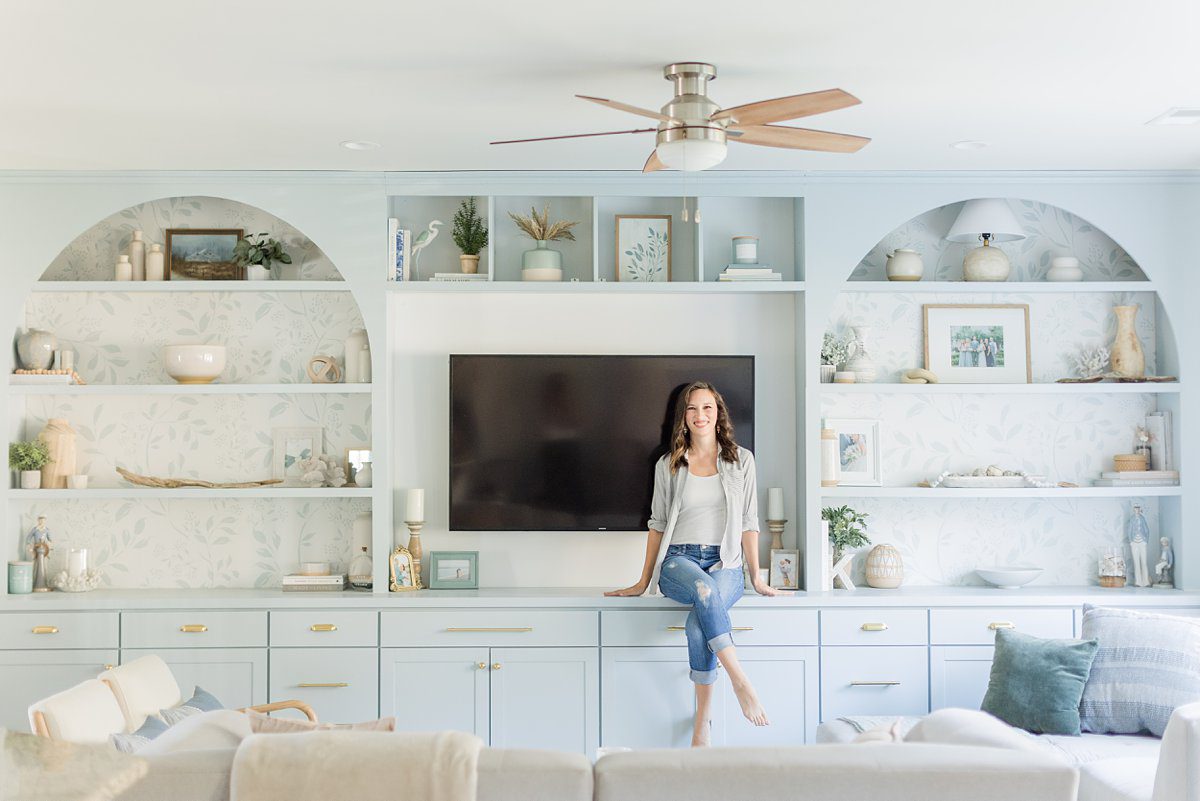
This was the very first project we took on when we moved into our new Charleston home. The previous owners had built out a cement fireplace on one side and then installed some very long and heavy floating shelves across the rest of the wall. It was fine, it just didn’t fit our style or the vibe of the house. So we decided to demo it all and build a full built-in entertainment center to ground the living room space.
As our first real DIY project we learned A LOT … meaning we made a lot of mistakes. But in the end I think it turned out amazing!! If you are contemplating taking on a large-scale DIY project, but are intimidated by the though of it all, let me encourage you that you can do more than you think!
MATERIALS & TOOLS
- Home Depot Hampton Bay base kitchen cabinets
- Butcher block
- 12″ x 1″ Common board
- Metal L-brackets
- 3/4 Plywood
- Pre-primed trim board
- Crown moulding
- Restoration Hardware cabinet pulls
- Clamps
- 2″ brad nails
- Ryobi brad nailer
- Jig Saw
- Ryobi Multi-Tool
- Pocket hole jig
- Wood filler
- Wood glue
- Paintable caulk
- 150 grit sand paper
- 220 grit sand paper
- Frog tape
- Plastic drop cloth
- Brown paper
- Graco paint sprayer
- Behr cabinet paint in the color Oceanic Climate
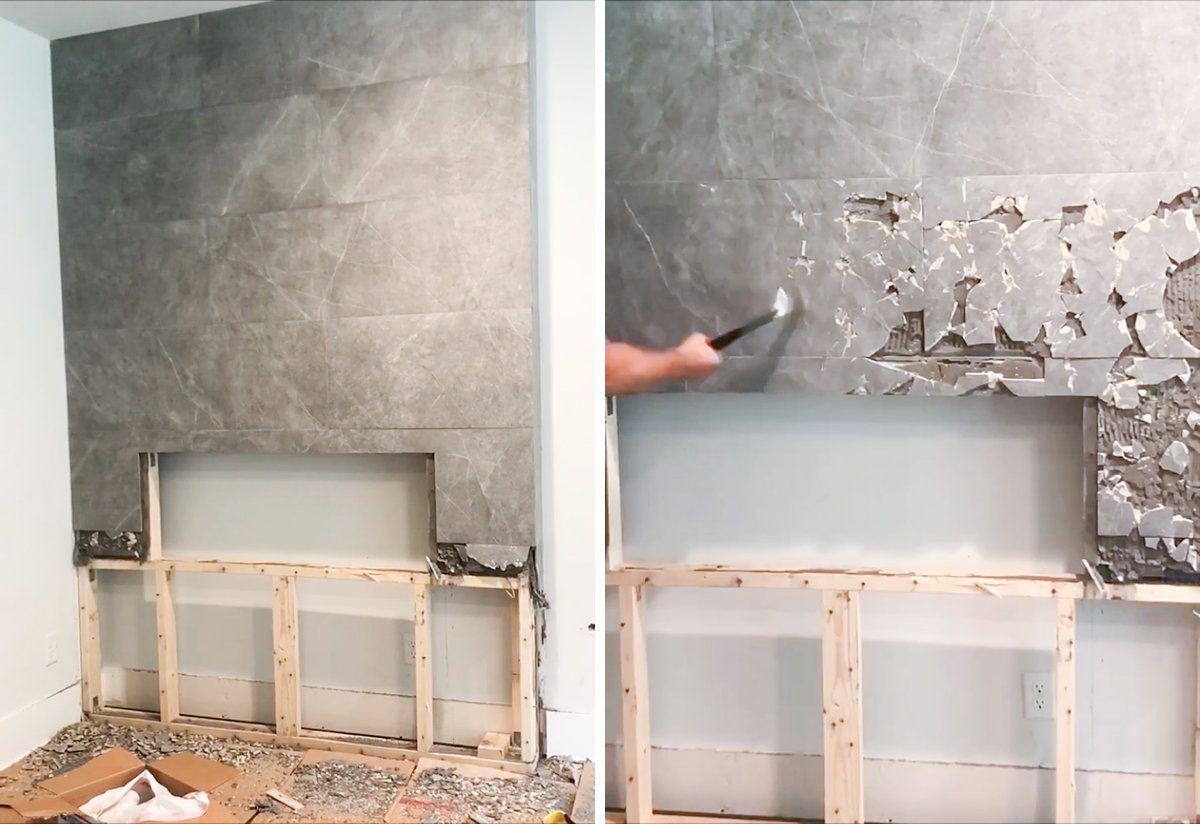
PART 1: DEMOLITION
To start the project we had to demo the existing fireplace surround. They had constructed it with 2x4s and large cement tiles. We did this before any of our boxes had arrived from our old house so we just borrowed a hammer, some work gloves and a drill from the neighbors and got to work! I’m not going to lie, this was extremely therapeutic and satisfying to just smash. I get why those wreck-it rooms are so popular!

PART 2: PAINTING & REMOVING BASEBOARD
Once all of the tiles and framing were removed, we painted the entire living room with a fresh coat of paint. Builders love to use flat paint on the entire home and I just can’t stand it. It’s impossible to clean and everything leaves a mark. We went with the Behr equivalent of Benjamin Moore Chantilly Lace. It’s easily become my favorite go-to white paint color!
We then had to remove the remaining baseboard from the back wall and measure how much of the baseboard we needed to remove from the side walls as well. I measured the length of the wall and came up with a configuration of cabinets that I liked. This included 2 double-wide cabinets, 2 three-drawer cabinets and 4 standard base cabinets. We measured the bottom of the cabinets we had purchased and then marked and cut using a multi-tool. I carefully removed the boards with a crowbar so the walls weren’t damaged.
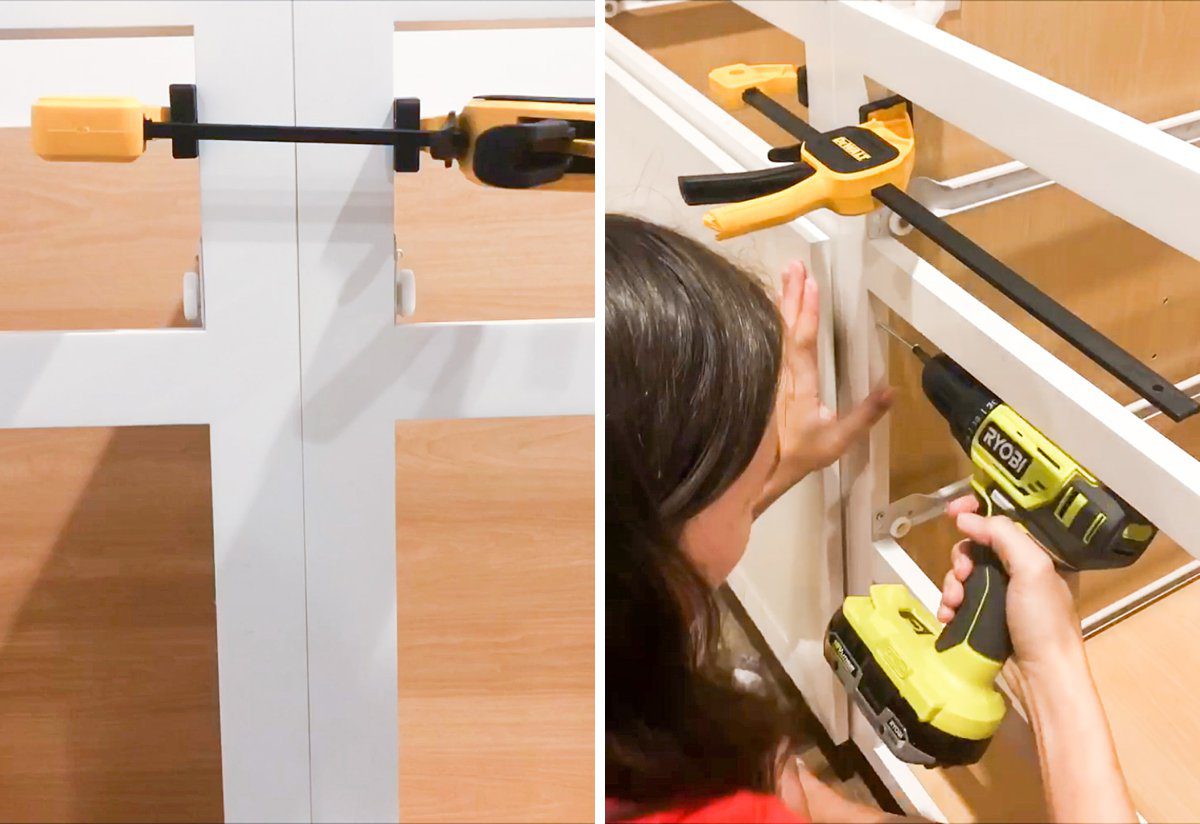
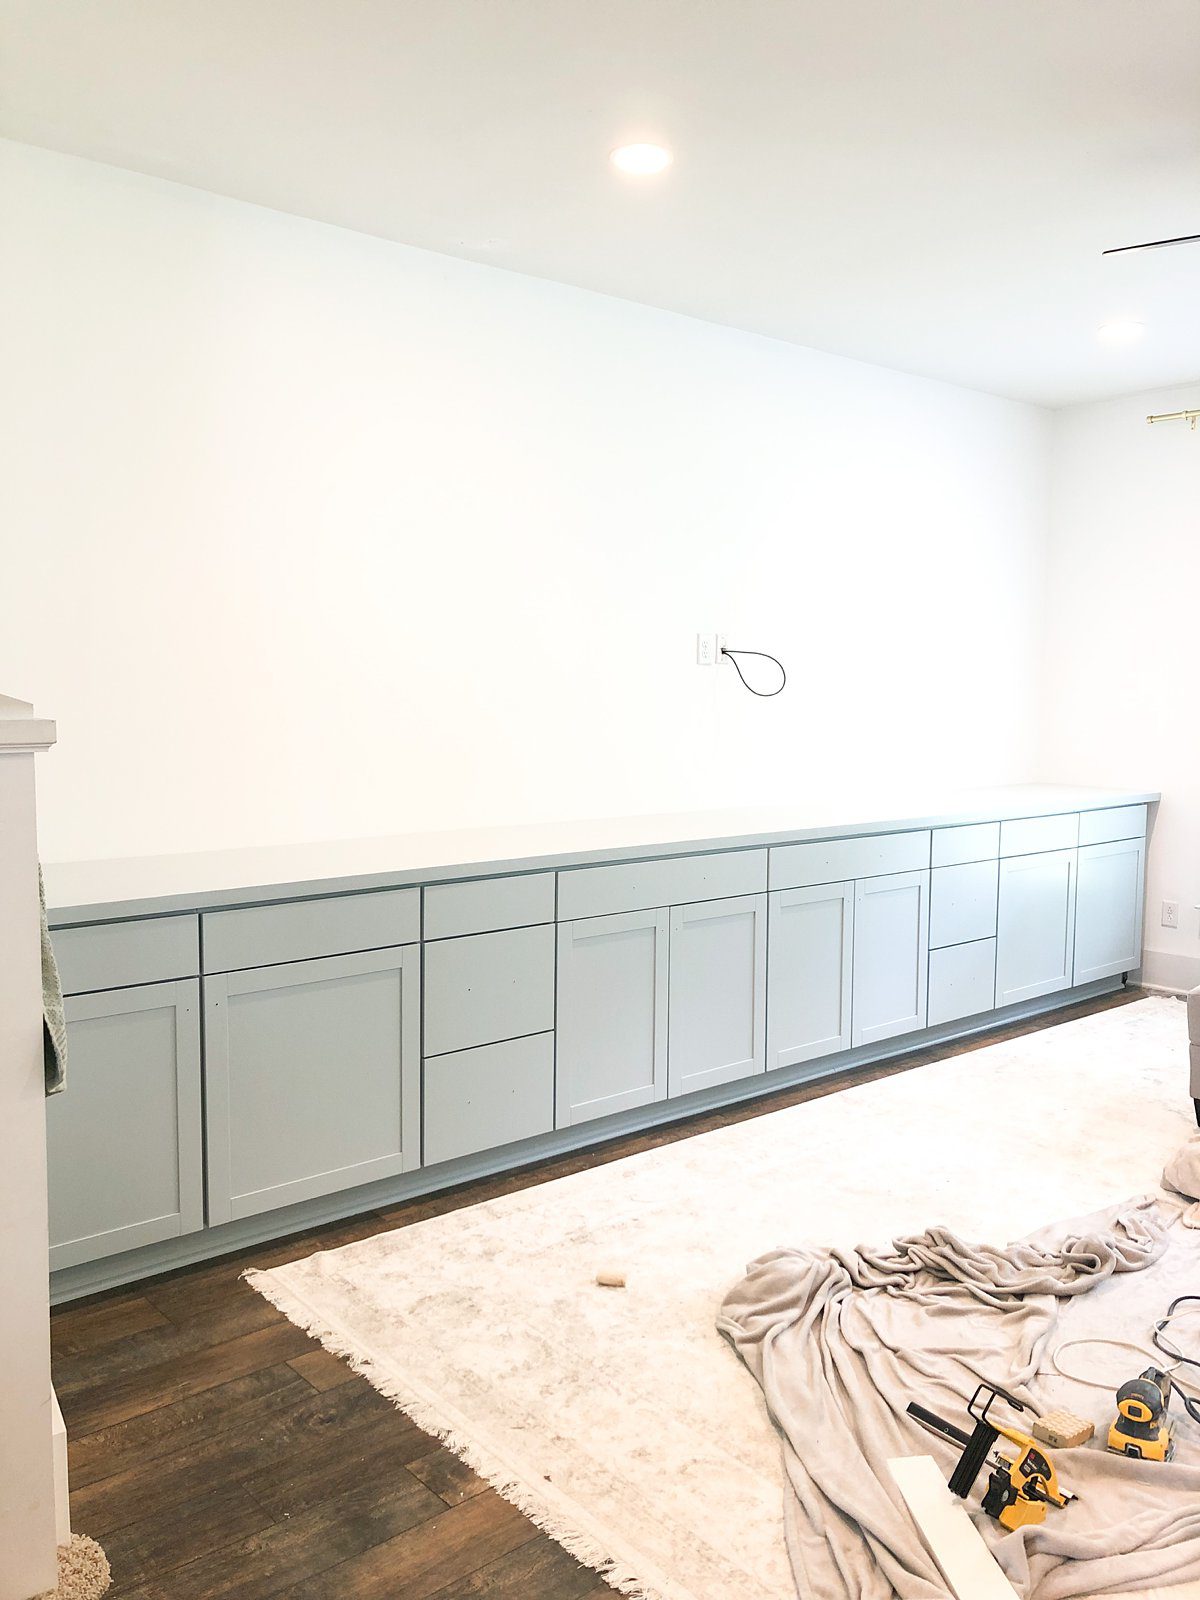
PART 3: ADDING IN THE BASE CABINETS
Since the total width of all of our cabinets wasn’t an exact match to the length of our wall, we had to center them on the wall and use some 2×4’s to construct something that would fill the gaps in on the sides, where we could secure the final trim pieces. After sliding all of the cabinets into place, we clamped them together to remove any gaps between them. Then, we marked where the studs were and secured the cabinets to the studs before moving on to securing the cabinets to each other. We did this through the sides of the frames. One thing to note here is that these cabinets have metal staples in them which are only visible inside the cabinet. Be sure to avoid those with your screws so they don’t break!
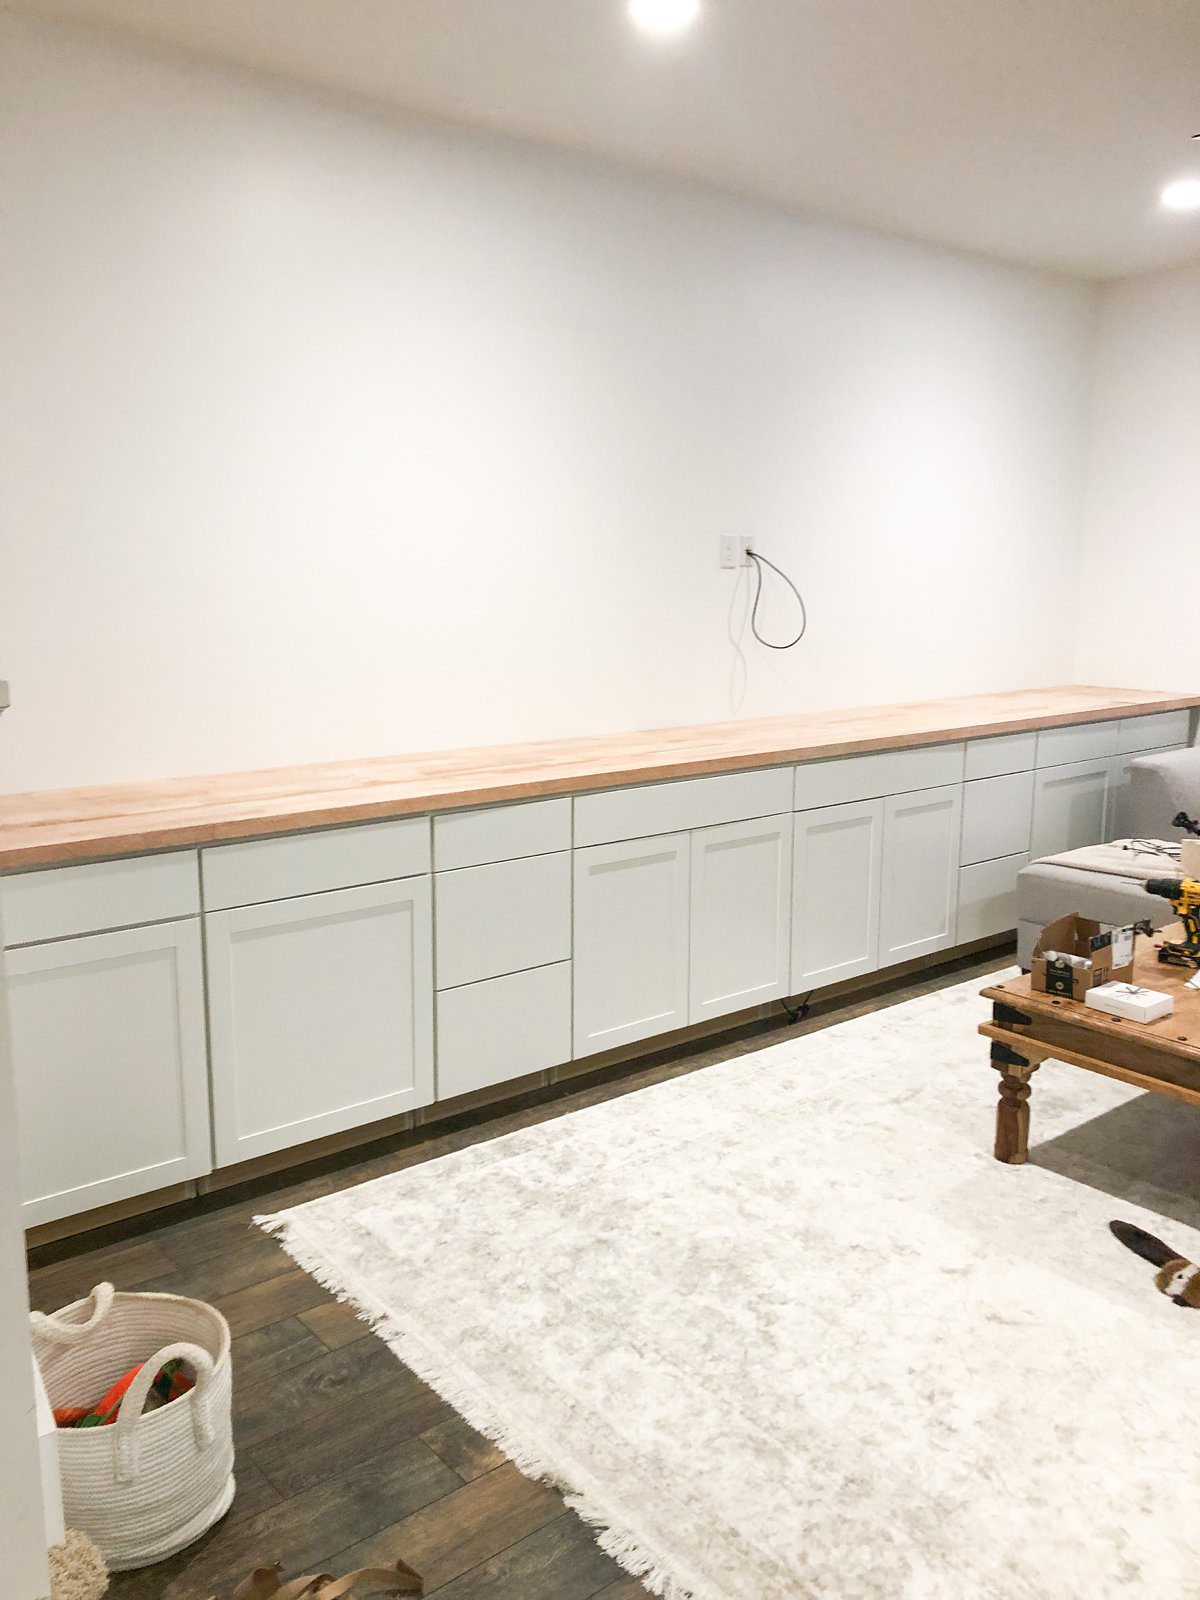
PART 4: THE COUNTERTOP
For our built-in countertops we purchased some second-hand lengths of butcher block that came in 16ft lengths. Our wall is 18ft long so we did have to purchase 3. We ripped and cut them down into two long lengths and two shorter lengths so that when they were all glued and secured together, it would be 18ft long by 26″ deep.

I used a lot of wood filler to fix any gouges, holes or other imperfections and then sanded it smooth. This piece was HEAVY so it did require both my husband and our neighbor to lift and fit it into place. Once it was in place, I primed the entire thing to get it ready for paint. I waited until it was in-place to prime because I wanted to make sure that it fit before I moved forward with painting and once it was there, it wasn’t coming back out haha.
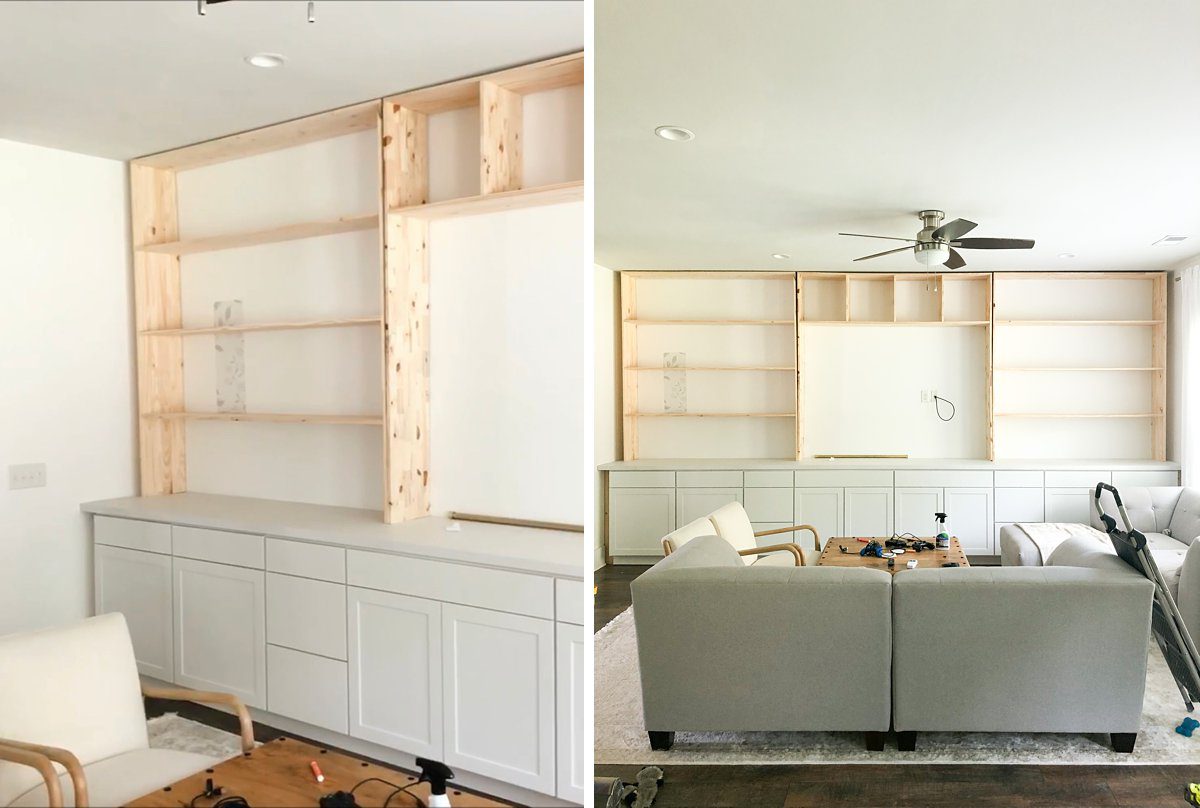
PART 5: ASSEMBLING SHELF UNITS
The next step was to build and assemble the upper shelving units. We decided to tackle this part in three separate sections. So we built out the two side units and then the center pieces and secured them together. We did all of this using 1×12 common boards and built them using a pocket-hole jig so all of the connections would be basically invisible. We double and triple-checked our measurements before cutting. Once they were assembled, we did a dry-fit in the space to make sure that it all fit as planned! Once we were happy with everything, we removed them for priming and painting.
PART 6: PAINTING THE CABINETS
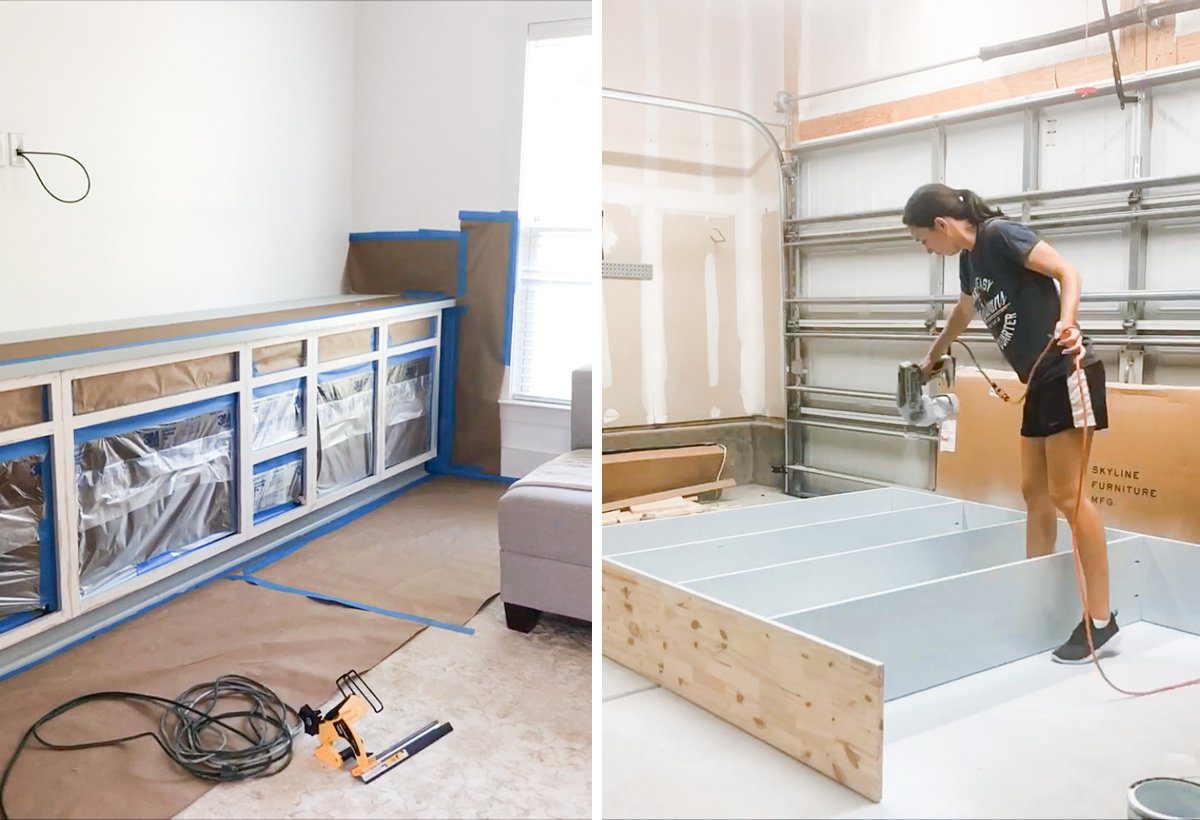
After priming everything, it was time for paint! I used Behr cabinet paint in the color Oceanic Climate which is a very pretty light blue that in certain light can lend itself to more of a grey tone. Another tip here so you can learn from my mistakes … check to make sure your cabinets are PRIMED and not FINISHED. I made the mistake of assuming that the cabinets were pre-primed, but they were in fact finished white so my first coat of paint did not stick. Instead, it pulled away from the existing surface, leaving these weird bald patches. So I had to completely sand it all off and then prime it before I could paint it again.
I did two coats of paint on all the visible sides of the shelving units, the cabinets doors (both sides), the drawer fronts (both sides), the countertop and the cabinet base frames. I used my Graco paint sprayer for all of this so I was left with a very nice, smooth finish.

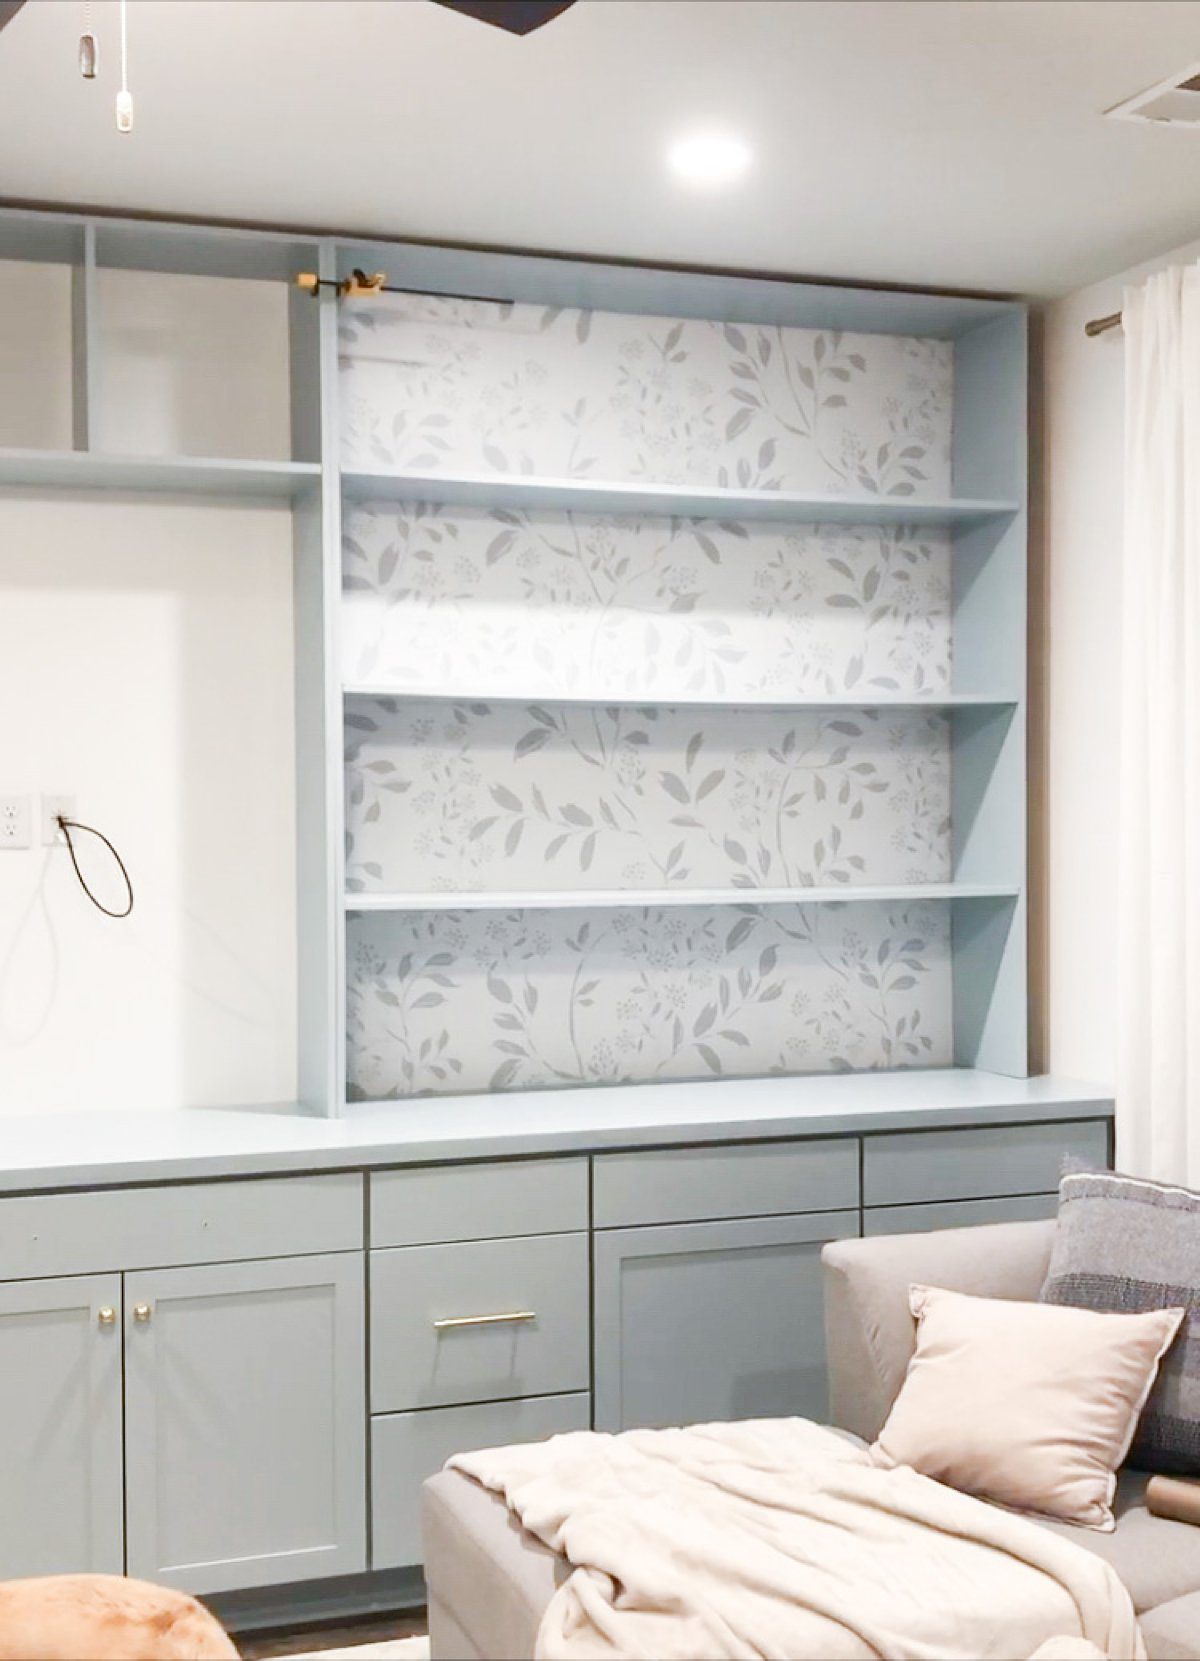
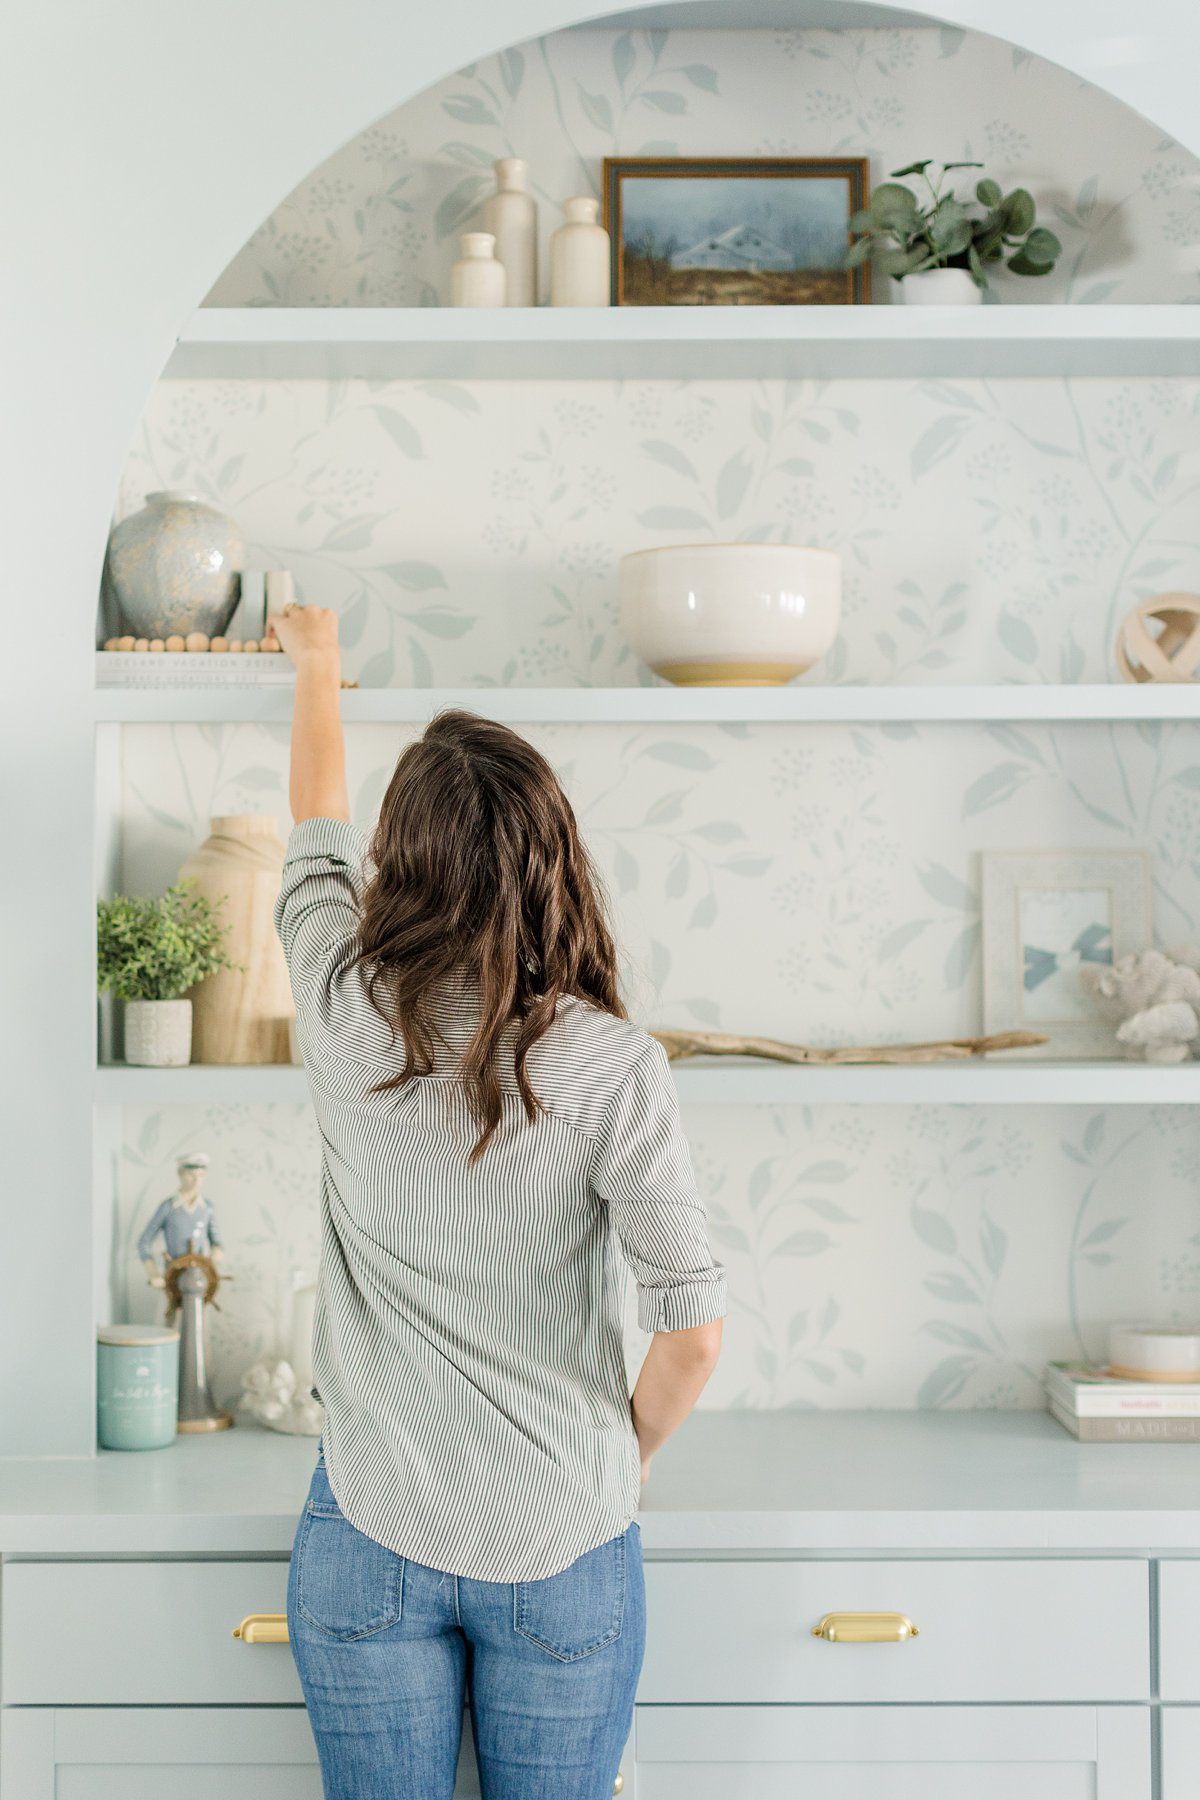
PART 7: INSTALLING WALLPAPER
The next step, was putting up some peel and stick wallpaper. If you do not want to add any wallpaper to the backs of your shelves, then you can just skip this part completely! I wanted to add a bit of pattern to this since it is such a big entertainment center. We purchased this wallpaper from Love vs. Design which allows you to not only select a pattern, but then customize the colors! I picked this really pretty leafy design and then customized it to a light blue color, which closely matched the paint color of our cabinets.
This part of the project did frustrate me, but I think it was because I had never installed any type of wallpaper before and as a perfectionist, I was not prepared to have to let go of some minor alignment issues. It took me multiple tries to get the panels of this paper to line up straight, but in the end it looks great and you can’t tell at all where any of the pattern elements are off. I installed the paper only on the sections of wall where the shelves would go so that the center section where the TV is mounted would remain white.
PART 8: PUTTING UP THE SHELVES
After the wallpaper was up, we put up the shelving units and using the same method as with the base cabinets, we clamped them together to remove gaps before securing them. We secured the shelves to the wall using L-brackets on the sides since it would be hidden by the trim pieces. Then we screwed them all together so they are held together as one large unit.
PART 9: TRIM AND ARCHES
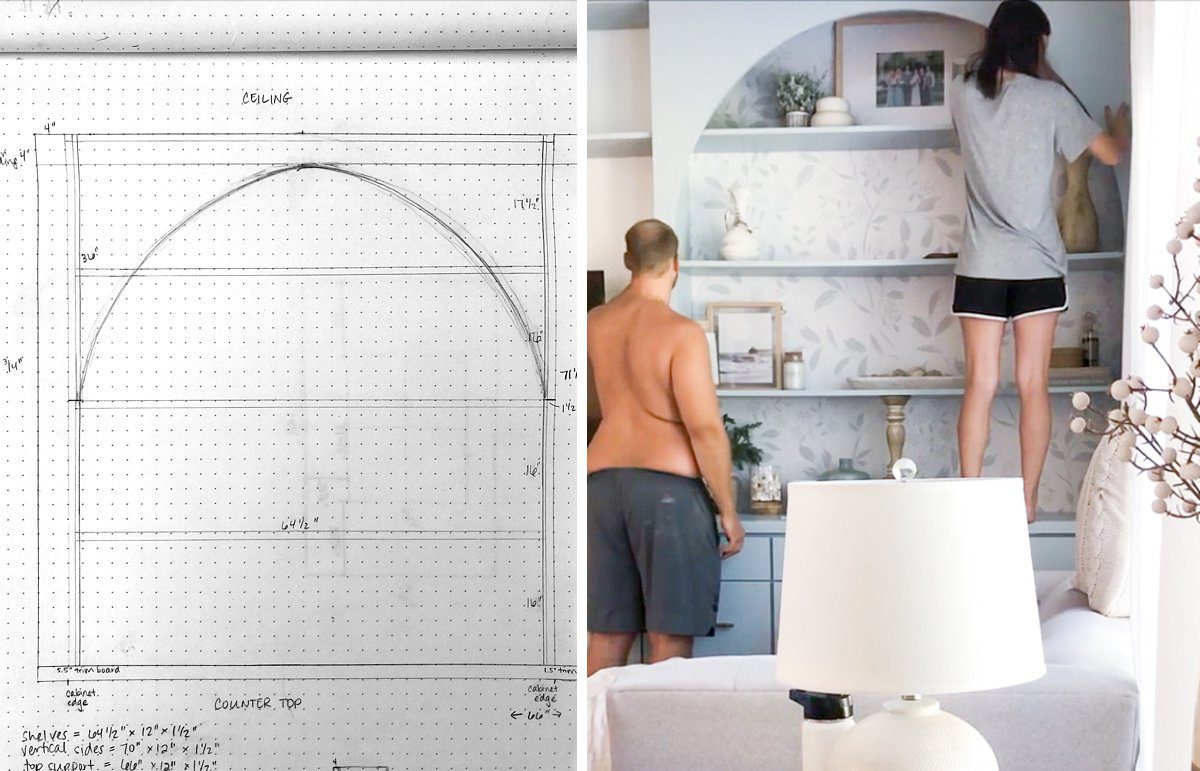
The last and final piece to this puzzle was the trim and arches. Because our wall was so long and the sides of the built-ins had a big gap between them and the side walls, we had to do some funky things to get the final trim to look correct. We ended up piecing together wide trim pieces, the plywood arches and thinner trim pieces which all sat once nailed in.
To cut the arches we had to measure how wide and how tall we wanted the arches as well as where the actual curve needed to start. This took a lot of trial and error, and your method of measurement will ultimately depend on your height and width requirements. I used a jig saw to cut this since it was a precise cut. Once it, and the rest of the trim boards were cut, primed and painted, we secured them all into place using a brad nailer. We then repeated this for the top crown moulding we picked out as well.
And that’s a wrap! This was such a fun and challenging experience, it definitely opened our eyes to the DIY world and made us more confident that we could do projects like this in the future. I have always dreamed of having built-ins in our living room, but I was convinced I needed to hire someone to do it. Boy, was I wrong! The initial investment in tools isn’t cheap, but they will last us for a long time. I can’t wait to show you more projects from our new Charleston home!


leave a comment